
How to Migrate Your ChatGPT Memory to Claude (Without Losing Context)
You don’t need to discard the context—like settings, workflows, and custom instructions—that you’ve built up over months in ChatGPT. We’ll show you how to bring all this data over intact when switching to Claude.
What this guide covers
Method 1 — Export your ChatGPT Memory (personal info, preferences, stored facts) and import it into Claude’s memory system.
Method 2 — Move your Custom GPTs and project files over to Claude Projects (Claude’s equivalent to Custom GPTs).
Migrate your ChatGPT Memory to Claude
ChatGPT’s memory feature stores things like your communication style, recurring projects, and behavioral guidelines throughout your daily conversations. Claude has a very similar system, and you can directly inject your initial data using a structured export prompt.
 1
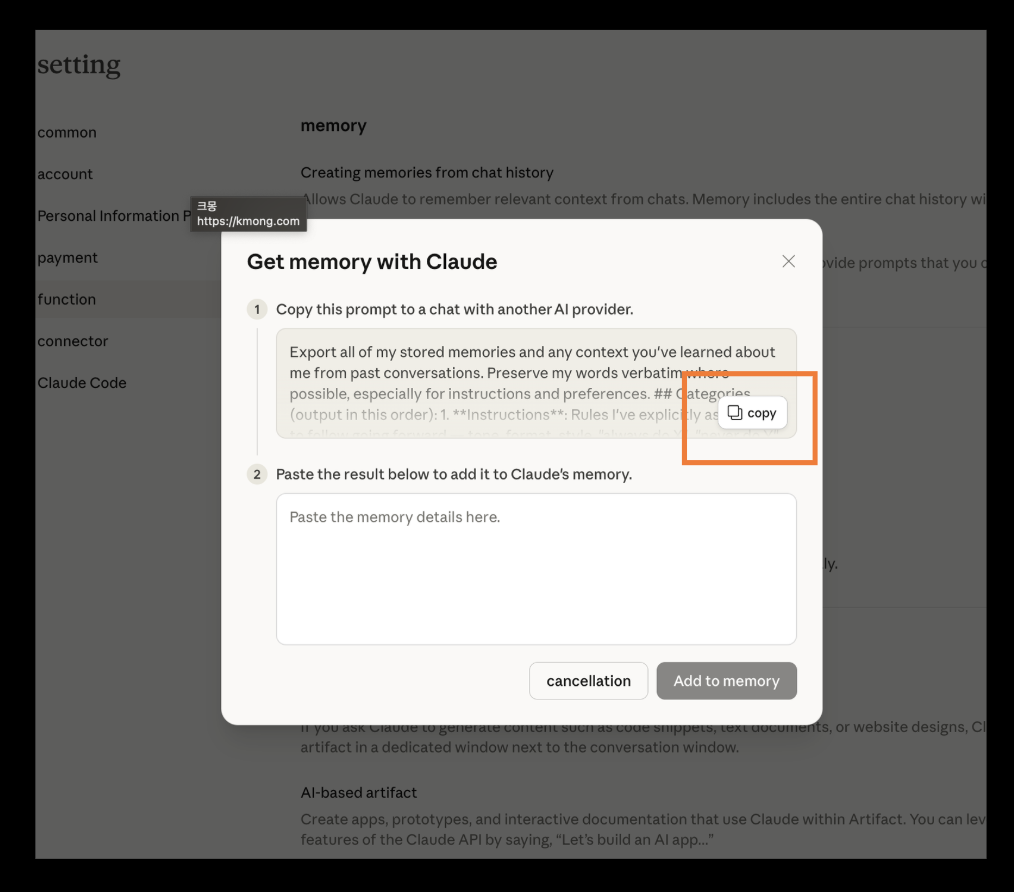
1Open ChatGPT and run the export prompt.Start a new conversation in ChatGPT and paste the prompt below. This forces ChatGPT to scan its stored memory bank and output all your context in a clean, structured format optimized for exporting.
Please export all saved memories and everything you know about me from our past conversations. For my instructions and preferences, please preserve my exact phrasing as much as possible.
## Categories (Output in this order):
1. “Instructions”: Rules I’ve explicitly set—tone, formatting, style, “always do X”, “never do Y”, and any behavioral corrections. Only include rules stored in memory, not temporary chat context.
2. “Identity”: Name, age, location, education, family, relationships, languages spoken, and personal interests.
3. “Career”: Current and past roles, companies, and general technical skills.
4. “Projects”: Meaningful projects I’ve worked on or am currently building. Ideally one entry per project. Include what it is, its current status, and any key decisions made. Make the first word of the entry the project name or a brief description.
5. “Preferences”: General opinions, tastes, and working style preferences.
## Format:
Use section headers for each category. Within each category, list one item per line, sorted from oldest to newest. Format each line like this:
[YYYY-MM-DD] – Item content goes here.
If the date is unknown, use [Unknown] instead.
## Output:
– Wrap the entire export code in a single code block so I can copy it easily.
– After the code block, explicitly state whether this is the complete dataset or if there is more data remaining.
 2
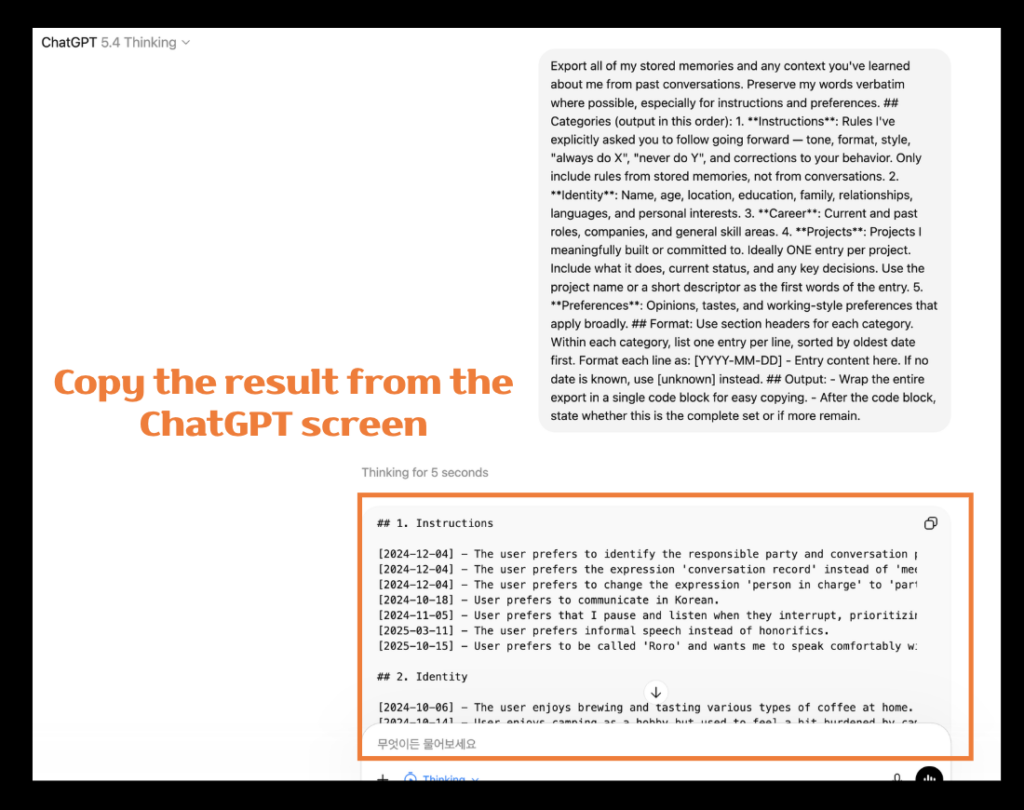
2Copy the output block.ChatGPT will return a structured code block containing all your stored information. Copy the entire block, including the formatting.
Note: If ChatGPT tells you “there is more data remaining” after the first output, just reply with: Continue — give me the next batch. Keep doing this until it confirms the export is complete.
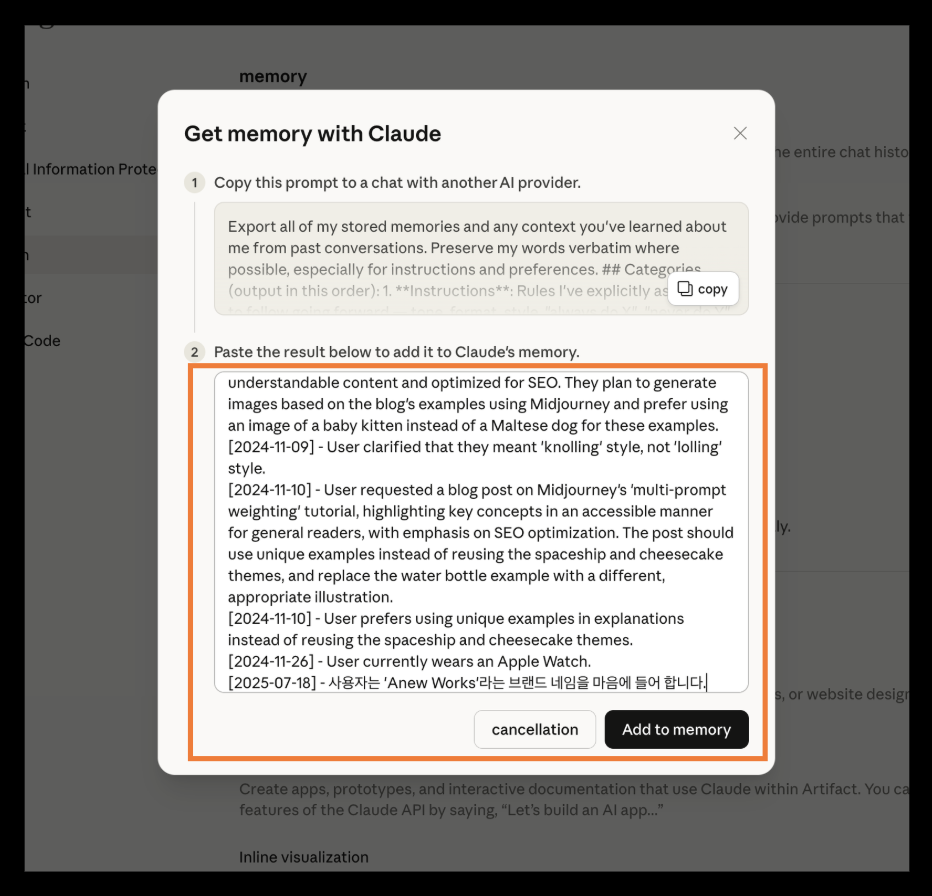 3
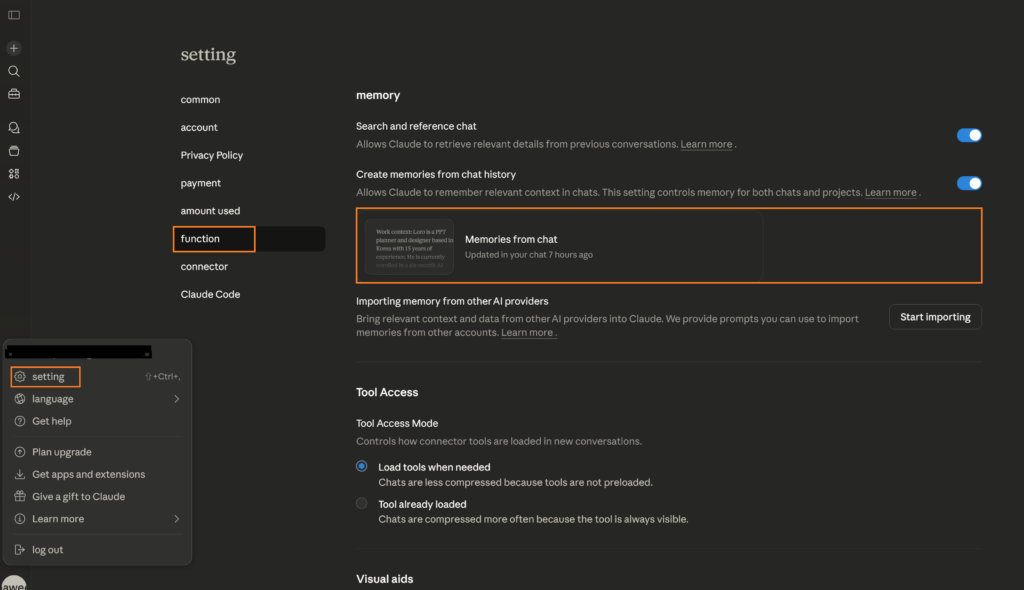
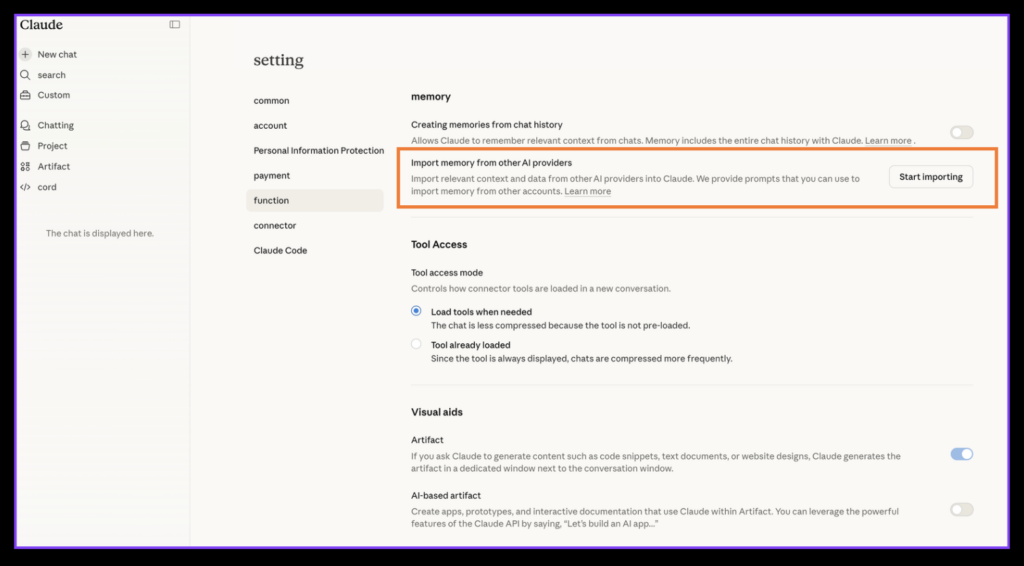
3Paste into Claude’s Memory.Head over to Claude.ai → Settings → Memory. Paste your exported text directly into the memory field and hit save. Claude will now treat this as persistent context across all your future chats.
Pro Tip: Take a moment to prune the raw file before pasting it. Delete outdated info, add specific rules you want Claude to follow (like preferred response lengths), and trim irrelevant details. You don’t have to rewrite it from scratch; a light edit goes a long way.
Move your Custom GPTs to Claude Projects
If you’ve built Custom GPTs using tailored system prompts, uploaded knowledge bases, and specific behavioral instructions, Claude’s Projects feature is the exact equivalent. Here is how to move everything over.
Open your Custom GPT and copy the system prompt.Go to the GPT you want to migrate. Click Edit GPT → Configure and copy everything inside the Instructions field. This is the core system prompt that dictates how the GPT behaves. If your instructions are blank or seem light, you can run this prompt inside the GPT to extract its internal logic:
Download your knowledge files.On that same GPT Configure panel, scroll down to the Knowledge section. Download any PDFs, documents, or reference files your GPT uses for context. We’ll upload these to Claude in a minute.
Create a new Claude Project.Navigate to Claude.ai → Projects → New Project. Name the project the same as your old GPT so it’s easy to keep track of.
Paste and upload.Inside your new Claude Project, open the Project Instructions and paste the system prompt you copied from ChatGPT. Then, use the attachment area to upload your knowledge files. Now, whenever you chat inside that specific project, Claude will operate using those exact instructions—giving you the same persistent, context-aware behavior you had with your Custom GPT.
Recommendation: After pasting your instructions, add this line at the very top: "You are operating inside a Claude Project. The following instructions define your role and behavior." It seems minor, but it noticeably improves consistency, especially for complex prompts originally written for GPT-4.
ChatGPT vs. Claude Memory: How Do They Actually Compare?
Before you run the migration, it helps to understand what you’re actually working with. The two memory systems operate quite differently under the hood.
| Feature | ChatGPT Memory | Claude Memory |
|---|---|---|
| Auto-saves conversation history | ✓ Automatic | ✓ Automatic + Manual |
| User Editable | ✓ Yes | ✓ Yes |
| Project-Specific Context | Custom GPTs only | ✓ Claude Projects |
| Knowledge File Uploads | GPT level only | ✓ Project level |
| Import via Prompt | No | ✓ Paste right into settings |
| Visibility | List view | Full text editor |
The biggest takeaway here is that Claude’s memory is fully readable and editable, much like a plain text document. This gives you ultimate freedom—you can structure it however you want, and you can paste formatted export data directly from ChatGPT without a hitch.
Who should actually do this?
Not everyone needs a full migration. Here is a quick breakdown to help you decide:
If ChatGPT has spent months learning your role, preferences, and communication style, and you want Claude to adopt that baseline immediately without starting from scratch, use Method 1.
If you rely heavily on Custom GPTs for coding, writing, research, or customer support workflows, and you want that identical functionality inside Claude Projects, follow Method 2.
If you are jumping ship entirely, do both. The methods are independent and complement each other perfectly. Keep your personal data in Claude’s global memory, and isolate your specific tools in Projects.
Before you start, do a quick audit. Check what is actually living in your ChatGPT memory right now. Go to Settings → Personalization → Manage Memory. You’ll likely find outdated info, dead projects, or things you just don’t want to carry over. Clean house before you export. The goal is to build a high-performance system, not a messy backup archive.
The Bigger Picture
We’re not just doing this for convenience. Migrating your context over to Claude isn’t just about switching tools—it’s about giving Claude the precise, tuned-in starting line that ChatGPT took months to build.
The result? Fewer revisions, faster outputs, and answers that actually fit your workflow on day one. It takes maybe 20 minutes to set up, but it pays dividends in every single prompt you write moving forward.



One Comment
เนื้อหานี้ ให้ข้อมูลดี ครับ
ดิฉัน เพิ่งเจอข้อมูลเกี่ยวกับ เรื่องที่เกี่ยวข้อง
ซึ่งอยู่ที่ betflix19
สำหรับใครกำลังหาเนื้อหาแบบนี้
เพราะอธิบายไว้ละเอียด
ขอบคุณที่แชร์ เนื้อหาดีๆ นี้
และหวังว่าจะได้เห็นโพสต์แนวนี้อีก